Thursday, October 11, 2012

BlackBerry 9500 Storm hard reset


BlackBerry 9630 Bold


Reset the device

A full reset is sometimes referred to as a hard reset. Perform a full reset when you want to clear all settings, programs and data from RAM.

Caution if you perform a full reset, your BlackBerry Bold 9700 Bold2 or 9780 returns to its default settings and looses all information that is not recorded in ROM.

Before you delete your BlackBerry® device data or media card files, consider backing up these items so that you have a copy on your computer. CAUTION: If you have turned on encryption, the process for deleting all device data can take up to an hour to complete. You cannot stop the process after you start it. If you reset your device, the process restarts after the device restarts.

To perform a hard reset:

On the Home screen or in a folder, click the Options icon.
Click Security *gt; Security Wipe.
To delete data from the messages application, contacts application, and other applications, select the Emails, Contacts, Etc check box.
To delete all third-party applications that you have added, select the User Installed Applications check box.
To delete all files from your media card, select the Media Card check box.
Type blackberry.
Click Wipe.


Reset the device


A full reset is sometimes referred to as a hard reset. Perform a full reset when you want to clear all settings, programs and data from RAM.

Caution if you perform a full reset, your BlackBerry Curve 8520 or 8530 returns to its default settings and looses all information that is not recorded in ROM.

Before you delete your BlackBerry® device data or media card files, consider backing up these items so that you have a copy on your computer. CAUTION: If you have turned on encryption, the process for deleting all device data can take up to an hour to complete. You cannot stop the process after you start it. If you reset your device, the process restarts after the device restarts.

To perform a hard reset:

On the Home screen or in a folder, click the Options icon.
Click Security *gt; Security Wipe.
To delete data from the messages application, contacts application, and other applications, select the Emails, Contacts, Etc check box.
To delete all third-party applications that you have added, select the User Installed Applications check box.
To delete all files from your media card, select the Media Card check box.
Type blackberry.
Click Wipe.


Reset the Blackberry 9500 or 9530 device

A full reset is sometimes referred to as a hard reset. Perform a full reset when you want to clear all settings, programs and data from RAM.

Caution if you perform a full reset, your BlackBerry Storm 9500 or 9530 returns to its default settings and looses all information that is not recorded in ROM.

Before you delete your BlackBerry® device data or media card files, consider backing up these items so that you have a copy on your computer. CAUTION: If you have turned on encryption, the process for deleting all device data can take up to an hour to complete. You cannot stop the process after you start it. If you reset your device, the process restarts after the device restarts.

To perform a hard reset:

1. On the Home screen or in a folder, click the Options icon.
2. Click Security *gt; Security Wipe.

* To delete data from the messages application, contacts application, and other applications, select the Emails, Contacts, Etc check box.
* To delete all third-party applications that you have added, select the User Installed Applications check box.
* To delete all files from your media card, select the Media Card check box.

1. Type blackberry.
2. Click Wipe.

New Nokia All Schematic 2012


Sony_Ericsson u8i Successfully Hard Rest 100% ok See Video

Sony_Ericsson u8i Successfully

Hard Rest 100% ok See Video


I Tested It So Download This Video


Press-----***7370** Password-0000


Video

Nokia Cable Finder Version-8 by Mehmood Riaz

Nokia x5 solution pack

Nokia all keypad solutions

SonyEricsson X10i charging ways


Sony Ericsson X10i Not Charging

Nokia Lumia 920 hard reset

:::Before you buy a new cell phone or new tablet, please try the following procedure to repair your device. First charge your battery, backup your important data if possible and in most cases take out SIM and SD card. It is impossible to recover your data after doing a hard reset, so online backup is always important. You can also backup your data on your hard drive or a raid system.::::


Nokia Lumia 920 hard reset

First try this to soft reset your Nokia 920 Lumia. Press and hold the Volume down and Power buttons until it vibrates, after that you have to release all the keys then phone will vibrate 3 times.
To hard reset your Nokia Lumia 920 using key combination

Turn off your Nokia Lumia 920. Press and hold the following buttons Camera + Volume down + Power until your phone vibrates, then release only the Power key and keep pressing the Camera + Volume down for a couple of seconds 4-5s.
or

  1. On the Start screen, tap .
  2. Tap Settings > about phone.
  3. Tap reset your phone, and then tap yes.

Nokia Hardware Solution

All in One Hardware and Software Driver Pack Laptop & PC x64 x32 Compressed Size 1.70 GB


This collection includes drivers for over 4,00,000 hardware components of products, manufacturers such as Acer, Dell, Apple, HP, Compaq, IBM, Sony, Touchmate, Wipro, Toshiba, Panasonic, as well as hardware component manufacturers Intel, 3Com, VIA, NVIDIA, ATI, SoundMAX, and many more! The collection includes two folders: Drivers for Laptop's and Drivers for PC's.


Download:

part01
part02
part03
part04
part05
part06
part07
part08
part09
part10
part11
part12
part13
part14
part15
part16
part17

HCL laptop bios password solotion

1. Shut down the computer. If you are unsure whether the
computer is off or in Hibernation, turn the computer on,
and then shut it down through the operating system.
2. Disconnect all external devices connected to the computer.
3. Disconnect the power cord.
4. Remove the battery pack by following these steps:
a. Turn the computer upside down with the front panel
toward you.
b. Slide and hold the battery release latch 1 to the left. (The
front edge of the battery pack disengages from the
computer.)
c. Lift the front edge of the battery pack 2 and swing it
back.
d. Remove the battery pack.
5. Remove the RTC battery from the socket on the system
board.
6. Wait approximately 5 minutes.
7. Replace the RTC battery and reassemble the computer.
8. Connect AC power to the computer. Do not reinsert any
battery packs at this time.
9. Turn on the computer.
All passwords and all CMOS settings have been cleared.
Contact manufacturer
If the above solutions do not help, it's recommended you contact the computer manufacturer or motherboard manufacturer for the steps on clearing the computer password.

How to clear an unknown BIOS or CMOS password

Question

How to clear an unknown BIOS or CMOS password.

Answer

Tip: The below steps are for a desktop computer and do not include steps on how to clear a laptop CMOS password.
If you encounter a password prompt at boot or the BIOS or CMOS setup is locked as shown below and you do not know the password you will need to clear the BIOS password using the suggestions listed below.
CMOS setup locked password screen
Clear using jumper (recommended)
Caution: When inside the computer be sure you're aware of the potential damage that can be caused by ESD.
CMOS password jumperOn the computer motherboard locate the BIOS clear or password jumper or dip switch and change its position. This jumper is often labeled CLEAR, CLEAR CMOS, JCMOS1, CLR, CLRPWD, PASSWD, PASSWORD, PSWD or PWD as shown in the picture to the right. To change the jumper remove it from the two pins its currently on so that it covers the pin that is not covered. For example, in the picture to the right pins 1 and 2 are covered, you'd remove the jumper and put it on pins 2 and 3.
Once this jumper has been changed, turn on the computer and the password should be cleared. Once cleared, turn the computer off and return the jumper or dip switch to its original position.
The location of the jumpers or dip switches are dependent on the manufacturer of the computer and motherboard. However, below are some general ideas on where to find it. Remember that most motherboards could have dozens of different jumpers, make sure you're changing the CMOS jumper and not something else. If these general suggestions do not help refer to your motherboard or computer documentation or skip to the next step.
  1. On the edge of the motherboard - Most jumpers are located on the side of the motherboard for easy accessibility, verify by looking at all visible edges of the motherboard.
  2. By the CMOS battery - Some manufactures will place the jumper to clear the CMOS or BIOS password by the actual CMOS battery.
  3. By the processor - Some manufactures will place the jumpers by the processor of the computer.
  4. Under the keyboard or bottom of laptop - If you are working on a laptop computer the location of the dip switch (almost never a jumper) can be under the keyboard or on the bottom of the laptop in a compartment such as the memory compartment.
  5. Other visible location - While it is possible that the jumpers or dip switches may not be in a visible location, most manufactures try to make things easier by placing the jumpers or dip switches in another visible location.
Generic passwords
Try using generic CMOS passwords. Note: many of these generic passwords are no longer used or only used with older computers.
Use a BIOS password utility
There are utilities designed to help bypass CMOS passwords. An example of a great utility to decrypt or bypass BIOS passwords is the PC BIOS Security and Maintenance toolkit.
Remove CMOS battery
CMOS batteryRemoving the CMOS battery like the one shown in the picture to the right will cause the system to lose all CMOS settings including the password. To do this locate and remove the CMOS battery on the motherboard for at least five-minutes. After this has been done put the battery back into the computer and turn it back on.
Jump the CMOS solder beads
Older computers and especially older laptops don't have jumpers or dip switches and require the user to jump a pair of solder beads on a circuit board. The identification and location of these solder beads can vary and if not available in computer documentation is only obtainable through the computer manufacturer.
If you've identified the solder beads they can be jumped by placing a flat-head screwdriver over the two beads and leaving it on those beads while turning on the computer. Once the computer has booted turn off the computer and then remove the screwdriver.
Contact manufacturer
If the above solutions do not help or you are unable to locate the jumpers or solder beads, it's recommended you contact the computer manufacturer or motherboard manufacturer for the steps on clearing the computer password.

How to Bypass or Remove a BIOS Password


A BIOS password is a protection measure that can be used to stop someone powering up a computer system or making changes in some of the computers most sensitive areas. Many big name computer manufacturers such as Dell and HP lock the customers out of this area because they don’t want the customer changing anything and potentially damaging the machine (which the manufacturer may have to warranty). However, when someone like a computer technician or hardware enthusiast needs to make some hardware changes to the computer, they will need to access the BIOS. Here are some methods to bypass or remove a BIOS password.

NOTE: Do not try to guess the password on a passworded Hard Drive. 3 wrong guesses will often result in the information on the hard drive being lost forever.
How to Bypass or Remove a BIOS Password by Removing the CMOS Battery:
The simplest way to remove a BIOS password is to simply remove the CMOS battery. A computer will remember its settings and keep the time even when it is turned off and unplugged because these parts are powered by small battery inside the computer called a CMOS battery. If we pull out this battery, the computer will forget alot of its hardware settings, including its BIOS password. This should not be performed on Laptops if you are not experienced working with laptop hardware.
Finding the CMOS BatteryAnyway, open up the computer case using a screw driver and locate the flat, circular and metallic CMOS battery. It should look something like the picture to the right. Some computers have this part standing upright.
Once you have located it, observe how the latches are holding it. There are many different ways to remove a CMOS battery but the most common way on newer computers can be seen in the picture below.
Removing the CMOS Battery
Make sure to power down the computer, unplug the power cables and unplug any USB devices if they are powered. The computer must not be able to get power from anywhere for this to work. Take out the CMOS battery and wait 10 – 25 minutes before putting it back in. The reason for this wait is because the computer can still store power in its capacitors even though everything is unplugged. The waiting period allows enough time for them to discharge.
Plug everything back in, power up the computer and enter the BIOS again. If everything went well there should be no more password. In some cases, if you get weird error messages during bootup now, you will need to goto “Load BIOS Defaults” in BIOS and save the changes to fix them.
If this method didn’t work, try one of the methods below.
How to Bypass or Remove a BIOS Password using Software:
!BIOS is a freeware utility which is designed to be a whole BIOS and security suite. It has the ability to decrypt the passwords used in some of the most common BIOS makes such as Award, Phoenix, American Megatrends, IMB etc..
It also has the ability to brute force the password (known as “blasters”). However, this method is dangerous and can result in some unexpected and unwanted results.
Note: Because of this applications password cracking abilities, some antivirus software may report it as a virus/trojan. This is a false positive.
To start using !BIOS, reboot your computer and take note of the BIOS type and version you are running. For example, If your motherboard uses Award BIOS you should look for the text “Award Medallion BIOS 6.0″ or something similar.
Download !BIOS from here and save it to your desktop. Then, open a DOS command windows by going to Start > Run and type: cmd
Once you see a black screen in front of you, type: cd desktop
You should now see something like: C:\Documents and Settings\YourUserName\Desktop>
Now type the name of the file you just downloaded, if you haven’t changed the name just type in: bios320.exe
!BIOS - Decrypting a BIOS Password
Use the down arrow and choose “Crackers” and then press the right arrow. Using the up and down arrows, select the BIOS that the motherboard is using and press Enter.
You should now see a menu asking what you want to crack, in most cases its the Supervisor or System Passwords you want to crack, so press the 1 key on your keyboard. It will then show you another menu asking how you want it to be cracked. Option 1 is pretty good so try that first by pressing the 1 key on your keyboard. You should now have your BIOS password.
Reboot the computer, enter the BIOS and try it out.
How to Bypass or Remove a BIOS Password using the manufacturer backdoor password:
On many computers (especially old ones), computer manufacturers build in backdoor passwords for their own technicians to use so they can access the BIOS when the hardware is being serviced. Here are some of the ones that have been reported. You may need to try quite a few passwords before you find one that works
These passwords are CaSe SeNsItIve.
AMI BIOS Backdoor Passwords:
  • A.M.I.
  • AAAMMMII
  • AMI
  • AMI?SW
  • AMI_SW
  • BIOS
  • CONDO
  • HEWITT RAND
  • LKWPETER
  • MI
  • Oder
  • PASSWORD
Award BIOS Backdoor Passwords:
  • (eight spaces)
  • 01322222
  • 589589
  • 589721
  • 595595
  • 598598
  • ALFAROME
  • ALLY
  • ALLy
  • aLLY
  • aLLy
  • aPAf
  • award
  • AWARD PW
  • AWARD SW
  • AWARD?SW
  • AWARD_PW
  • AWARD_SW
  • AWKWARD
  • awkward
  • IOSTAR
  • CONCAT
  • CONDO
  • Condo
  • condo
  • d8on
  • djonet
  • HLT
  • J256
  • J262
  • j262
  • j322
  • j332
  • J64
  • KDD
  • LKWPETER
  • Lkwpeter
  • PINT
  • pint
  • SER
  • SKY_FOXSYXZ
  • SKY_FOX
  • syxz
  • SYXZ
  • TTPTHA
  • ZAAAADA
  • ZAAADA
  • ZBAAACA
  • ZJAAADC
  • Russian Award BIOS Passwords:
  • %øåñòü ïpîáåëîâ%
  • %äåâÿòü ïpîáåëîâ%
Phoenix Backdoor BIOS Passwords:
  • BIOS
  • CMOS
  • phoenix
  • PHOENIX
Other Manufcaturers Backdoor Passwords: (manufacturer name – password)
  • VOBIS and IBM – merlin
  • Dell – Dell
  • Biostar – Biostar
  • Compaq – Compaq
  • Enox – xo11nE
  • Epox – central
  • Freetech – Posterie
  • IWill – iwill
  • Jetway – spooml
  • Packard Bell – bell9
  • QDI – QDI
  • Siemens – SKY_FOX
  • SOYO – SY_MB
  • TMC – BIGO
  • Toshiba – Toshiba

Remove Bios Password

Longlife for laptop battery

How to Prolong Lithium-based Batteries

 
What Causes Lithium-ion to Age?
The lithium-ion battery works on ion movement between the positive and negative electrodes. In theory, such a mechanism should work forever, but shelf life, cycling and temperature affect the performance. Because batteries are used under many demanding environmental conditions, manufacturers take a conservative approach and specify a battery life between 300 and 500 discharge/charge cycles. Life cycle testing is easy to measure and is well understood by the user. Some organizations also add a date stamp of three to five years; however, this method is less reliable because it does not include the type of use.
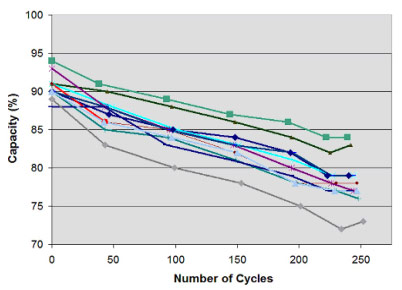
Figure 1 illustrates the capacity drop of 11 Li-polymer batteries that have been cycled at a Cadex laboratory. The 1500mAh pouch cells were first charged to 4.20V/cell at 1C rate (1500mA) and allowed to saturate to 0.05C (75mA) as part of full charge procedure. The batteries were then discharged at 1500mA to 3.0V/cell, and the cycle was repeated.
Capacity drop as part of cycling
Figure 1: Capacity drop as part of cycling. A pool of new 1500mA Li-ionbatteries for smart phone istested on a Cadex C7400 battery analyzer. All 11 pouch packs show a starting capacity of 88–94 percent and decrease in capacity to 73–84 percent after 250 full discharge cycles (2010).
Courtesy of Cadex
Designed for a smart phone, the packs were already a few months old at time of testing and none of the batteries made it to 100 percent. It is common to see lower than specified capacities and shelf life may have contributed to this. Manufacturers tend to overrate their batteries; they know that very few customers would complain. In our test, the expected capacity loss was uniform over the 250 cycles. All sample batteries performed as expected.
Similar to a mechanical device that wears out faster with heavy use, so also does the depth of discharge (DoD) determine the cycle count. The smaller the depth of discharge, the longer the battery will last. If at all possible, avoid frequent full discharges and charge more often between uses. If full discharges cannot be avoided, try utilizing a larger battery. Partial discharge on Li-ion is fine; there is no memory and the battery does not need periodic full discharge cycles other than to calibrate the fuel gauge on a smart battery.
Table 2 compares the number of discharge/charge cycles a battery can deliver at various DoD levels before lithium-ion is worn out. We assume end of life when the battery capacity drops to 70 percent. This is an arbitrary threshold that is application based.
Depth of discharge
Discharge cycles
Table 2: Cycle life and depth of discharge
A partial discharge reduces stress and prolongs battery life. Elevated temperature and high currents also affect cycle life.
100% DoD
50% DoD
25% DoD
10% DoD
500
1500
2500
4700
Specifying battery life by the number of discharge cycles is not complete by itself; equally if not more important are temperature conditions and charging voltages. Lithium-ion suffers stress when exposed to heat and kept at a high charge voltage.
Elevated temperature is anything that dwells above 30°C (86°F), and a high voltage is higher than 4.10V/cell. When estimating longevity, these conditions are difficult to assess because the battery state is in constant flux, and so is the temperature in which it operates. Exposing the battery to high temperature and being at full state-of-charge for an extended time can be more damaging than cycling. Manufacturers do not like to talk about these environmental conditions and release information only in confidence when so requested.
In this essay we do not depend on the manufacturer’s specifications alone but also listen to the comments of users. BatteryUniversity.com is an excellent sounding board to connect with the public and learn about reality. This approach might be unscientific, but it is genuine. When the critical mass speaks, the manufacturers listen. The voice of the multitude is in some ways stronger than laboratory tests performed in sheltered environments.
Let’s look at real-life situations and examine what stress a lithium-ion battery encounters. Most packs last three to five years, less if exposed to high heat and if kept at a full charge. Table 3 illustrates capacity loss as a function of temperature and state-of-charge. One can clearly see a performance drop of recoverable capacity caused by environmental conditions and not cycling. The worst condition is keeping a fully charged battery at elevated temperatures, which is the case when running a laptop on the power grid. Under these circumstances the battery will typically last for about two years, whether cycled or not. The pack does not die suddenly but will produce decreasing runtimes as part of aging.
Battery Temperature
Permanent capacity loss when
stored at 40% state-of-charge
(recommended storage charge level)
Permanent capacity loss when
stored at 100% state-of-charge
(typical user charge level)
0°C
25°C
40°C
60°C
2% loss in 1 year; 98% remaining
4% loss in 1 year; 96% remaining
15% loss in 1 year; 85% remaining
25% loss in 1 year 75%; remaining
6% loss in 1 year; 94% remaining
20% loss in 1 year; 80% remaining
35% loss in 1 year; 65% remaining
      40% loss in 3 months
Table 3: Permanent capacity loss of lithium‑ion as a function of temperature and charge level. High charge levels and elevated temperatures hasten permanent capacity loss. Newer designs may show improved results.
Batteries are also exposed to elevated temperature when charging with wireless chargers. The energy transfer from a charging mat to the portable device is 70 to 80 percent and the remaining 20 to 30 percent is lost mostly in heat. Placing a cellular phone on the heat generating charging mat stresses the battery more than if charged on a designated charger. We keep in mind that the mat will cool down once the battery is fully charged. Read more: Charging without wires.
Equally stressful is leaving a battery in a hot car, especially if exposed to the sun. When not in use, store the battery in a cool place. For long-term storage, manufacturers recommend a 40 percent charge. This allows for some self-discharge while still retaining sufficient charge to keep the protection circuit active. Finding the ideal state-of-charge is not easy; this would require a discharge unit with an appropriate cut-off. Users should not worry too much about the state-of-charge; a cool and dry place is more important.
The voltage level to which the cells are charged also plays a role in extending longevity. For safety reasons, most lithium-ion cannot exceed 4.20V/cell. While a higher voltage would boost capacity, over-voltage shortens service life. Figure 4 demonstrates the increased capacity but shorter cycle life if Li-ion were allowed to exceed the 4.20V/cell limit. At 4.35V, the capacity would increase by 10 to 15 percent, but the cycle count would be cut in half. More critical than the extra capacity is reduced safety, which would be the results of a higher charge voltage.
Effects on cycle life at elevated charge voltages

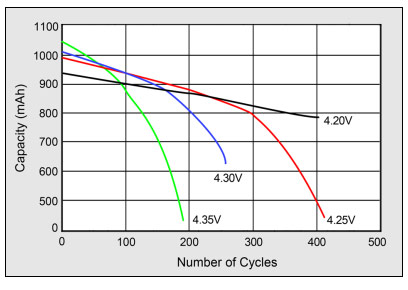
Figure 4: Effects on cycle life at elevated charge voltages
Higher charge voltages boost capacity but lower cycle life and compromise safety.
Source: Choi et al. (2002)
Chargers for cellular phones, laptops and digital cameras bring the Li-ion battery to 4.20V/cell. This allows maximum runtime, and the consumer wants nothing less than optimal use of the battery capacity. The industry, on the other hand, is more concerned with longevity and prefers lower voltage thresholds. Satellites and electric vehicles are examples where longevity is important.
We have limited information by how much lower charge voltages prolong battery life; this depends on many conditions, as we have learned. What we do know, however, is the capacities. At a charge to 4.10V/cell, the battery holds a capacity that is about 10 percent less than going all the way to 4.20V/cell. In terms of optimal longevity, a charge voltage limit of 3.92V/cell works best but the capacity would be low. Besides selecting the best-suited voltage thresholds, it is also important that the battery does not stay in the high-voltage stage for a long time and is allowed to drop after full charge has been reached.
The voltage threshold of commercial chargers cannot be changed, and making it adjustable would have advantages, especially for laptops as a means of prolonging battery life. When running on extended AC mode, the user would select the “long life” mode and the battery would charge to only, say, 4.05V/cell. This would get a capacity of about 80 percent. Before traveling the user would apply the “full charge mode” to bring the charge to 4.20V/cell. This saturation charge would take about an hour and would fill the battery to 100 percent capacity.
Realizing the stress on the battery, some laptop and cellular phone manufacturers choose an end-of-charge voltage that is less than 4.20V/cell. A slightly larger pack compensates for the reduced runtime. Another option to extend battery life is removing the pack from the laptop when running on the power grid. The Consumer Product Safety Commissionadvises the public to do this out of concern for overheating and causing a fire. Removing the battery has the disadvantage of losing unsaved work on power failure.
Heat buildup is always a concern and running a laptop in bed or on a pillow may contribute to this by restricting airflow. Not only will heat stress electronic components, elevated temperature causes the electrodes in the battery to react with the electrolyte and this will permanently lower the capacity. Placing a ruler or other object under the laptop to increase floor clearance improves air circulation around the enclosure and keeps the unit cooler.
The question is often asked: Should I disconnect my laptop from the power grid when not in use? Under normal circumstances this should not be necessary because once the lithium-ion battery is full, a correctly functioning charger will discontinue the charge and will only engage when the battery voltage drops to a low level. Most users do not remove the AC power, and I like to believe that this practice is safe.
Everyone wants to keep the battery as long as possible and use it in a way that is least stressful. This is not always feasible. Sometimes we need to run the battery in environments that are not conducive to optimal service life. As a doctor cannot predict how long a person will live based on diet and activity alone, so also does the life of a battery vary, and it can always be cut short by an unexpected failure. Batteries and humans share the same volatility.
To get a better understanding of what causes irreversible capacity loss in Li-ion batteries, several research laboratories* are performing forensic tests. Scientist dissected failed batteries to find suspected problem areas on the electrodes. Examining an unrolled 1.5-meter-long strip (5 feet) of metal tape coated with oxide reveals that the finely structured nanomaterials have coarsened. Further studies revealed that the lithium ions responsible to shuttle electric charge between the electrodes had diminished on the cathode and had permanently settled on the anode. This results in the cathode having a lower lithium concentration than a new example, a phenomenon that is irreversible. Knowing the reason for such capacity loss might enable battery manufacturers to produce future batteries with longer life spans.

Power loss through Protection Circuit

Besides common aging, a Li-ion battery can also fail because of undercharge. This occurs if a Li-ion pack is stored in a discharged condition. Self-discharge gradually lowers the voltage of the already discharged battery and the protection circuit cuts off between 2.20 and 2.90V/cell. Some chargers and battery analyzers (including those from Cadex) provide a wake-up feature, or “boost,” to re-energize and recharge these seemingly dead Li-ion batteries.
*   Research is performed by the Center for Automotive Research at the Ohio State University in collaboration with Oak Ridge National Laboratory and the National Institute of Standards Technology.

Sony Ericsson Xperia X10 hard reset

With the phone turned off, press both LEFT and RIGHT buttons on the front and POWER ON the X10 to HARD RESET.


Download PC Companion for your Xperia phone


You can reinstall your android firmware to solve too many pattern attempts issue forgotten pattern lock code
If you experience problems with your phone, check these tips before you try anything else:
Restart your phone.
Remove and re-insert the battery and SIM card. Then restart your phone.


Resetting Sony Ericsson Xperia X10 phone

1st try xperia x10 hard reset with key combo
With the phone turned off, press both LEFT and RIGHT buttons on the front and POWER ON the X10 to HARD RESET.
If nothing works: As last resort do a Sony Ericsson Xperia X10 phone repaire with PC Suite. USE THIS METHOD FOR 100% Xperia X10 hard reset AFTER INSTALLATION----*gt; TOOLS *gt; PHONE REPAIR

Aino? - PC Suite - Downloads - Mobile phones - Support - Sony Ericsson


--------------------------------------------------------------------------------------------------------------------------------------------------------------------------
With the phone turned off, press both LEFT and RIGHT buttons on the front and POWER ON the X10 to HARD RESET.

Resetting the phone deletes all data, including downloaded applications, and resets the
phone back to its initial state, the state before you turned on the phone for the first time.
Make sure to back up important data you have on the phone before you reset the phone.
To reset the X10 phone

1 From the Home screen, tap the applications bar.
2 Tap Settings *gt; SD card * phone storage *gt; Factory data reset *gt; Reset phone.
3 Enter your screen unlock pattern.
4 Tap Erase everything.

Wednesday, October 10, 2012

BlackBerry 9300 hard reset


Reset the device
A full reset is sometimes referred to as a hard reset. Perform a full reset when you want to clear all settings, programs and data from RAM.

Caution if you perform a full reset, your BlackBerry Curve 9300 returns to its default settings and looses all information that is not recorded in ROM.

Before you delete your BlackBerry® device data or media card files, consider backing up these items so that you have a copy on your computer. CAUTION: If you have turned on encryption, the process for deleting all device data can take up to an hour to complete. You cannot stop the process after you start it. If you reset your device, the process restarts after the device restarts.

To perform a hard reset:

On the Home screen or in a folder, click the Options icon.
Click Security *gt; Security Wipe.
To delete data from the messages application, contacts application, and other applications, select the Emails, Contacts, Etc check box.
To delete all third-party applications that you have added, select the User Installed Applications check box.
To delete all files from your media card, select the Media Card check box.
Type blackberry.
Click Wipe.

BlackBerry 9100 hard reset


Reset the device
A full reset is sometimes referred to as a hard reset. Perform a full reset when you want to clear all settings, programs and data from RAM.

Caution if you perform a full reset, your BlackBerry 9600 or 9630 Tour returns to its default settings and looses all information that is not recorded in ROM.

Before you delete your BlackBerry® device data or media card files, consider backing up these items so that you have a copy on your computer. CAUTION: If you have turned on encryption, the process for deleting all device data can take up to an hour to complete. You cannot stop the process after you start it. If you reset your device, the process restarts after the device restarts.

To perform a hard reset:

On the Home screen or in a folder, click the Options icon.
Click Security *gt; Security Wipe.
To delete data from the messages application, contacts application, and other applications, select the Emails, Contacts, Etc check box.
To delete all third-party applications that you have added, select the User Installed Applications check box.
To delete all files from your media card, select the Media Card check box.


Reset the Blackberry 9100 pearl device
A full reset is sometimes referred to as a hard reset. Perform a full reset when you want to clear all settings, programs and data from RAM.

Caution if you perform a full reset, your BlackBerry Curve 9300 returns to its default settings and looses all information that is not recorded in ROM.

Before you delete your BlackBerry® device data or media card files, consider backing up these items so that you have a copy on your computer. CAUTION: If you have turned on encryption, the process for deleting all device data can take up to an hour to complete. You cannot stop the process after you start it. If you reset your device, the process restarts after the device restarts.

To perform a hard reset:

On the Home screen or in a folder, click the Options icon.
Click Security *gt; Security Wipe.
To delete data from the messages application, contacts application, and other applications, select the Emails, Contacts, Etc check box.
To delete all third-party applications that you have added, select the User Installed Applications check box.
To delete all files from your media card, select the Media Card check box.
Type blackberry.
Click Wipe.

Blackbarry 9100 Lcd No Light Solution


blackberry 9000 ringer cracking sound solution


Blackberry 9000 Camera Not Working Solution


Blackberry 8900 keypad trackball solution


BlackBerry 8900 hard reset


Reset the device


A full reset is sometimes referred to as a hard reset. Perform a full reset when you want to clear all settings, programs and data from RAM.

Caution if you perform a full reset, your BlackBerry Curve 8900 or 8910 returns to its default settings and looses all information that is not recorded in ROM.

Before you delete your BlackBerry® device data or media card files, consider backing up these items so that you have a copy on your computer. CAUTION: If you have turned on encryption, the process for deleting all device data can take up to an hour to complete. You cannot stop the process after you start it. If you reset your device, the process restarts after the device restarts.

To perform a hard reset:

On the Home screen or in a folder, click the Options icon.
Click Security *gt; Security Wipe.
To delete data from the messages application, contacts application, and other applications, select the Emails, Contacts, Etc check box.
To delete all third-party applications that you have added, select the User Installed Applications check box.
To delete all files from your media card, select the Media Card check box.
Type blackberry.
Click Wipe

Nokia 1202 not charging solution


Nokia 1202 power switch ways


Nokia 1202 sim Solution


Nokia 1202 no light Solution New

Nokia 1202 no light Solution New